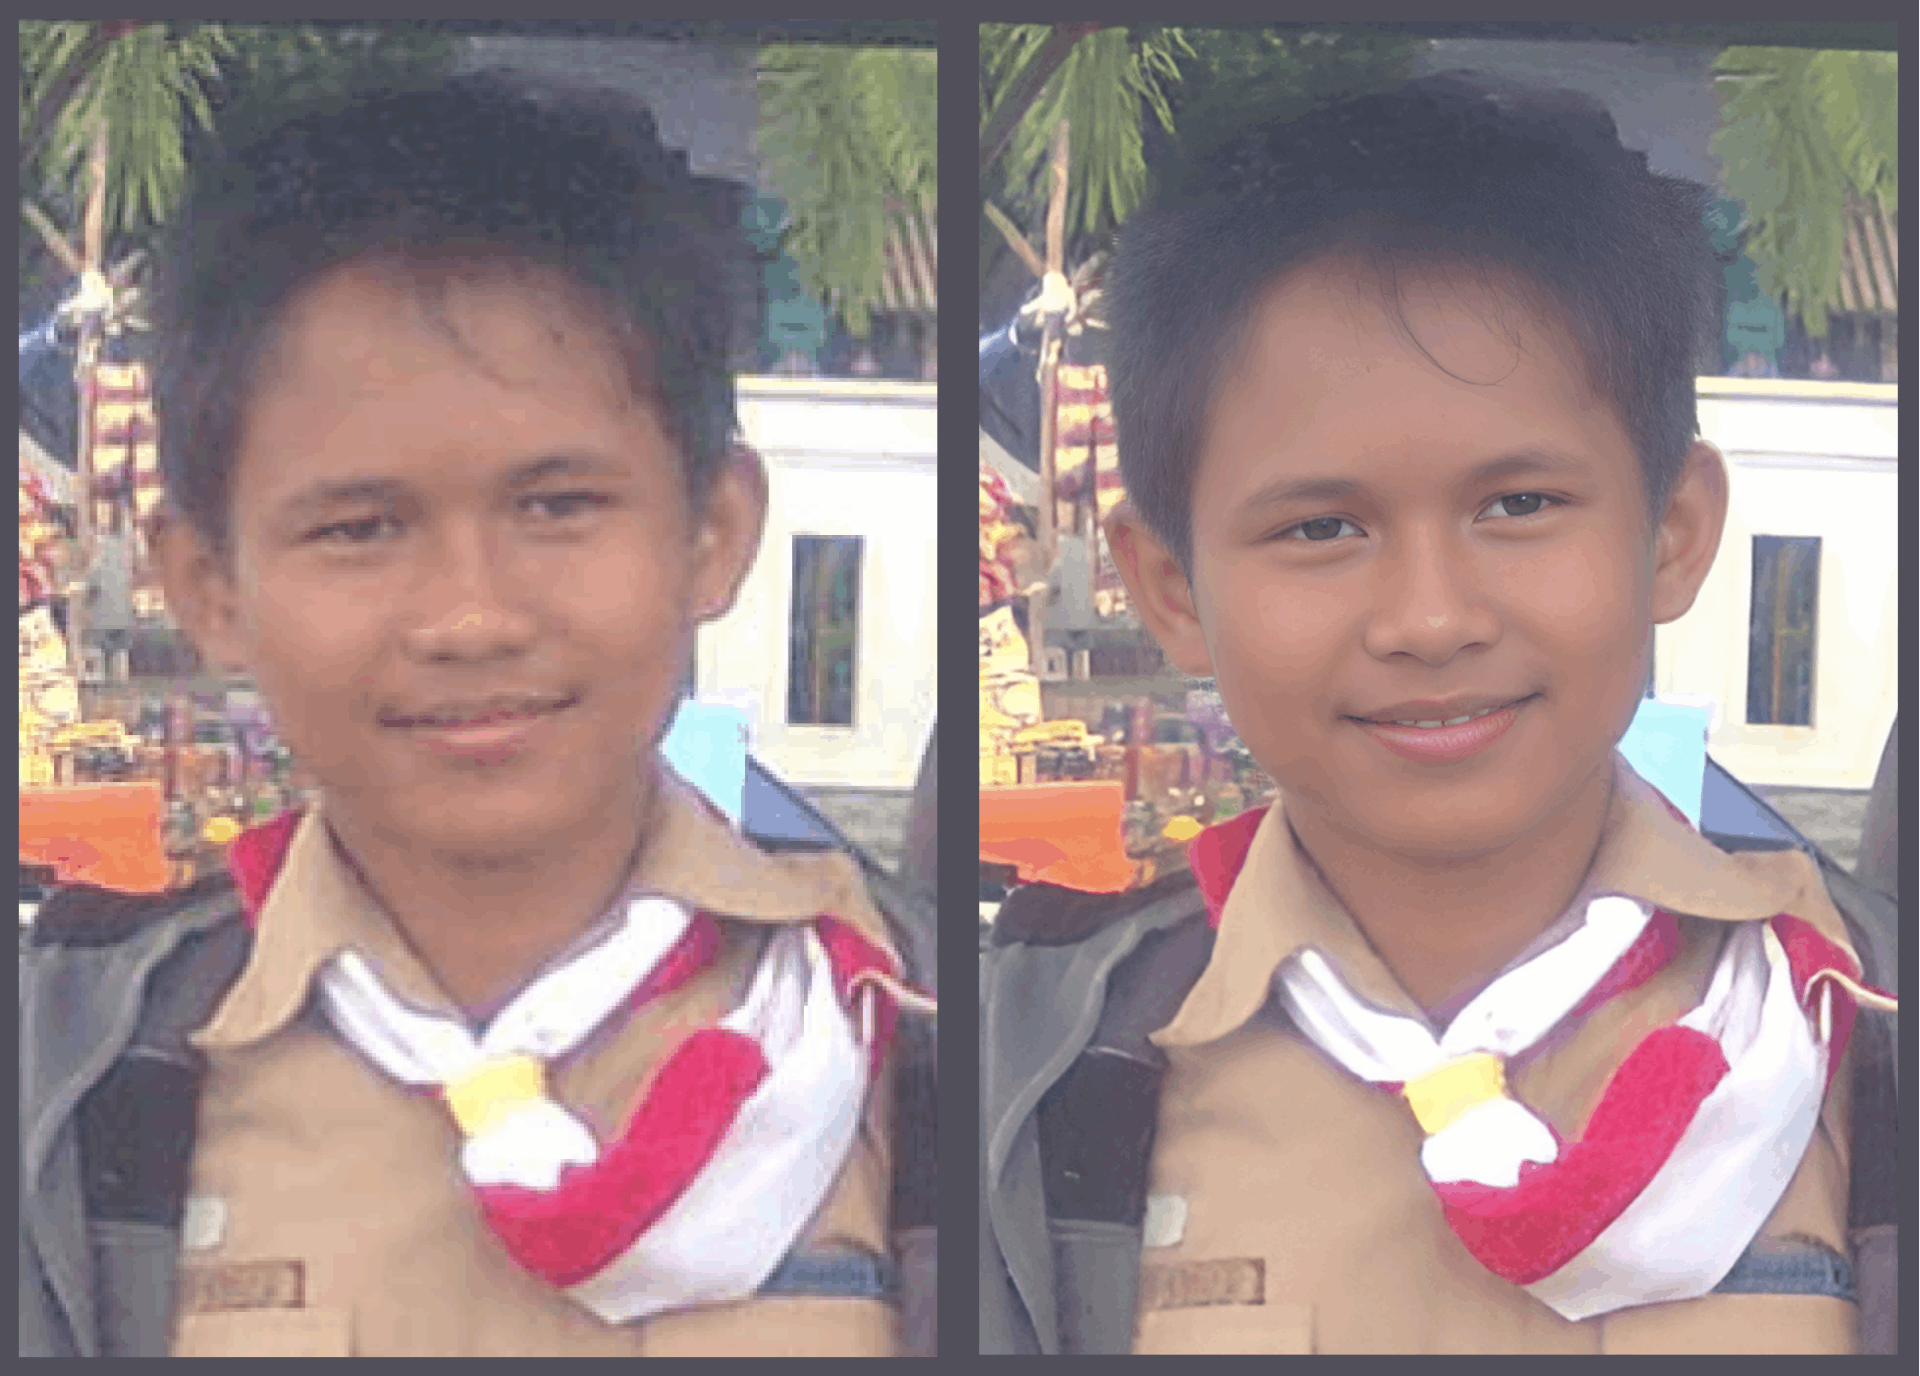
Today we are going to learn another AI that we can use in our Laravel Application. On of the most interesting AI that we will learn today is Codeformer its an AI model that can restore old photo to a better quality.
Here's example photo of mine when I was in high school, this is amazing.

Today, we will learn how to use the Replicate API in Laravel to create photo restoration with AI.
Replicate
The problem with running a machine learning model is that it is very expensive if we set up the server ourselves. But luckliy these day we can get cheaper way to run machine learning model with Replicate.
Running the machine learning model in Replicate it's like running cloud function, we only get charge when we use the compute power. This is perfect if we just getting started to do some research or experimental project.
So before we started writing some code go ahead to register new account to replicate.com. Then go to this codeformer API page on replicate, you can see example python code and curl.
Create Project
So let's create a new project, this time we will name our project by PictureRevive.
laravel new PictureReviveWhen you done go back to your replicate account go to your profile page and copy your api token and put it to .env file.
REPLICATE_API_TOKEN=f69977ae2f12d631b19b601a4bc8642cbbcc10f3Note! This is example token, this is fake and you should not share your api token.
Now go to config/app.php and register the config there.
return [
    ...
    'replicate' => [
        'api_token' => env('REPLICATE_API_TOKEN')
    ]
];
Since we are interacting with the API we need to install guzzle client so we can use laravel http client interface.
composer require guzzlehttp/guzzleReplicate Service
Let's create some class colled ReplicateService inside folder app/Services to wrap our API call to replicate api. We will do two API call, first to upload our photo to replicate and second is to get the progress of the prediction by the model.
First let's import some package to the service.
<?php

namespace App\Services;

use Illuminate\Support\Facades\Http;
use Illuminate\Support\Facades\Storage;

/**
 * Class ReplicateService
 *
 * This class handles the interactions with the Replicate API.
 *
 * @package App\Services
 */
class ReplicateService
{
}
Let's add some constructor to setup the dependency for this class.
private $headers;
private $modelVersion;
private $url;

public function __construct() {
    $this->headers = [
        'Authorization' => 'Token ' . config('app.replicate.api_token')
    ];
    $this->modelVersion = '7de2ea26c616d5bf2245ad0d5e24f0ff9a6204578a5c876db53142edd9d2cd56';
    $this->url = 'https://api.replicate.com/v1/predictions';
}
Now add method predict to upload photo.
/**
 * Make a prediction using the image provided.
 *
 * @param string $image The image in base64 format
 * @return \Illuminate\Http\Response
 */
public function predict($image)
{
    return Http::withHeaders($this->headers)
        ->timeout(60)
        ->post($this->url, [
            'version' => $this->modelVersion,
            'input' => [
                "image" => $image,
            ],
        ]);
}
After uploading the photo now we need to get the progress of the prediction. Let's add new method getPrediction this method will accept param id.
/**
 * Get the progress of an AI prediction by id.
 *
 * @param string $id
 * @return \Illuminate\Http\Response
 */
public function getPrediction($id)
{
    return Http::withHeaders($this->headers)
        ->acceptJson()
        ->timeout(60)
        ->get("{$this->url}/{$id}");
}
Now the last method for this class is to convert upload image to base64, this is will be used when we uploading the image to replicate.
/**
 * Convert an image to base64 format.
 *
 * @param string $path
 * @return string
 */
public function imageToBase64($path)
{
    $image = Storage::get($path);
    $mimeType = Storage::mimeType($path);
    $base64 = base64_encode($image);
    return "data:" . $mimeType . ";base64," . $base64;
}
The Controller
Let's setup some controller called HomeController to connect the API with our user.
php artisan make:controller HomeControllerThen import all dependency we need.
<?php

namespace App\Http\Controllers;

use App\Services\ReplicateService;
use Illuminate\Http\Request;
use Illuminate\Support\Facades\Storage;
use Illuminate\Support\Facades\Validator;
use Illuminate\Support\Str;

class HomeController extends Controller
{
}
Setup the contruct method to inject ReplicateService dependency.
protected ReplicateService $replicateService;

/**
 * HomeController constructor.
 *
 * @param ReplicateService $replicateService
 */
public function __construct(ReplicateService $replicateService)
{
    $this->replicateService = $replicateService;
}
Now add new function to render our UI client.
/**
 * Display the UI client for user uploading the photos.
 *
 * @return \Illuminate\Http\Response
 */
public function index()
{
    return view("welcome");
}
Now let's handle when user uploading the photo.
/**
 * Upload a photo to Replicate API.
 *
 * @param  \Illuminate\Http\Request  $request
 * @return \Illuminate\Http\Response
 */
public function store(Request $request)
{
    $validator = Validator::make($request->all(), [
        'photo' => 'required|image',
    ]);

    if ($validator->fails()) {
        return response([
            "error" => true,
            "errors" => $validator->errors(),
        ], 400);
    }

    $photo = $request->file('photo');
    $name = Str::random(40) . "." . $photo->getClientOriginalExtension();
    $originalPath = Storage::putFileAs('public/photos', $photo, $name);
    $image = $this->replicateService->imageToBase64($originalPath);

    try {
        $response = $this->replicateService->predict($image);
    } catch (\Exception $e) {
        return response([
            "error" => true,
            "message" => $e->getMessage()
        ], 500);
    }

    if ($response->getStatusCode() != 201) {
        return response([
            "error" => true,
            "message" => "Failed!"
        ], 400);
    }

    $resp = $response->json();
    return [
        'original' => asset('/storage/photos/' . $name),
        'result' => [
            "id" => $resp['id']
        ]
    ];
}
Then the last one let's add one more function to get the progress of the AI prediction.
/**
 * Get the status of the AI prediction for a specific image.
 *
 * @param string $id - The ID of the image prediction
 * @return \Illuminate\Http\Response
 */
public function status($id)
{
    try {
        $response = $this->replicateService->getPrediction($id);
    } catch (\Exception $e) {
        return response([
            "error" => true,
            "message" => $e->getMessage()
        ], 500);
    }

    if ($response->getStatusCode() != 200) {
        return response([
            "error" => true,
            "message" => "Failed!"
        ], 400);
    }

    return $response->json();
}
One last thing let's register this controller to our route in routes/web.php.
<?php

use Illuminate\Support\Facades\Route;
use App\Http\Controllers\HomeController;

Route::get('/', [HomeController::class, 'index']);
Route::post('/', [HomeController::class, 'store']);
Route::get('/status/{id}', [HomeController::class, 'status']);
Up until now we are done with the backend code.
UI Client
For the UI part, we are not going to discuss the CSS part. However, this is some basic CSS code you can copy and paste to get a style like in the example above.
We will keep the basic style that was included from the Laravel starter project and we will add this new CSS file to support some of our layout.
body {
    font-family: 'Space Grotesk', sans-serif;
}
input::-webkit-file-upload-button {
    margin-top: 10px;
    margin-bottom: 6px;
    border: none;
    padding: .8rem;
    border-radius: .4rem;
    background-color: white;
    --tw-shadow: 0 1px 3px 0 rgb(0 0 0 / .1), 0 1px 2px -1px rgb(0 0 0 / .1);
    --tw-shadow-colored: 0 1px 3px 0 var(--tw-shadow-color), 0 1px 2px -1px var(--tw-shadow-color);
    box-shadow:var(--tw-ring-offset-shadow, 0 0 #0000),var(--tw-ring-shadow, 0 0 #0000),var(--tw-shadow);
    cursor: pointer;
}

@media (prefers-color-scheme: dark) {
    input::-webkit-file-upload-button {
        color: white;
        background-color:rgb(31 41 55);
    }
}

input:hover {
    opacity: 70%;
}

.title-text {
    --bg-size: 400%;
    --color-one: hsl(15 90% 55%);
    --color-two: hsl(40 95% 55%);
    font-size: clamp(2rem, 25vmin, 3rem);
    padding: 0;
    margin: 0;
    font-weight: 700;
    background: linear-gradient(
                    90deg,
                    var(--color-one),
                    var(--color-two),
                    var(--color-one)
                ) 0 0 / var(--bg-size) 100%;
    color: transparent;
    background-clip: text;
    -webkit-background-clip: text;
    animation: move-bg 8s infinite linear;
}

.btn-download {
    width: 100%;
    padding-left: 2rem;
    padding-right: 2rem;
    padding-top: .7rem;
    padding-bottom: .7rem;
    border-radius: .4rem;
    cursor: pointer;
    border-width: 1px;
    display: none;
}

@media (prefers-reduced-motion: no-preference) {
    .title-text {
        animation: move-bg 8s linear infinite;
    }
    @keyframes move-bg {
        to {
            background-position: var(--bg-size) 0;
        }
    }
}

.pt-6{
    padding-top:1.5rem;
}

.spinner {
    width: 48px;
    height: 48px;
    display: inline-block;
    box-sizing: border-box;
    position: relative
}
.spinner-round:before {
    border-radius: 50%;
    content: " ";
    width: 48px;
    height: 48px;
    display: inline-block;
    box-sizing: border-box;
    border-top: solid 6px #f97316;
    border-right: solid 6px #f97316;
    border-bottom: solid 6px #f97316;
    border-left: solid 6px #f97316;
    position: absolute;
    top: 0;
    left: 0
}
.spinner-round:after {
    border-radius: 50%;
    content: " ";
    width: 48px;
    height: 48px;
    display: inline-block;
    box-sizing: border-box;
    border-top: solid 6px hsl(15 90% 55%);
    border-right: solid 6px #fed7aa;
    border-bottom: solid 6px #fed7aa;
    border-left: solid 6px #fed7aa;
    position: absolute;
    top: 0;
    left: 0;
    animation: spinner-round-animate 1s ease-in-out infinite
}
@keyframes spinner-round-animate {
    0% {
        transform: rotate(0)
    }
    100% {
        transform: rotate(360deg)
    }
}
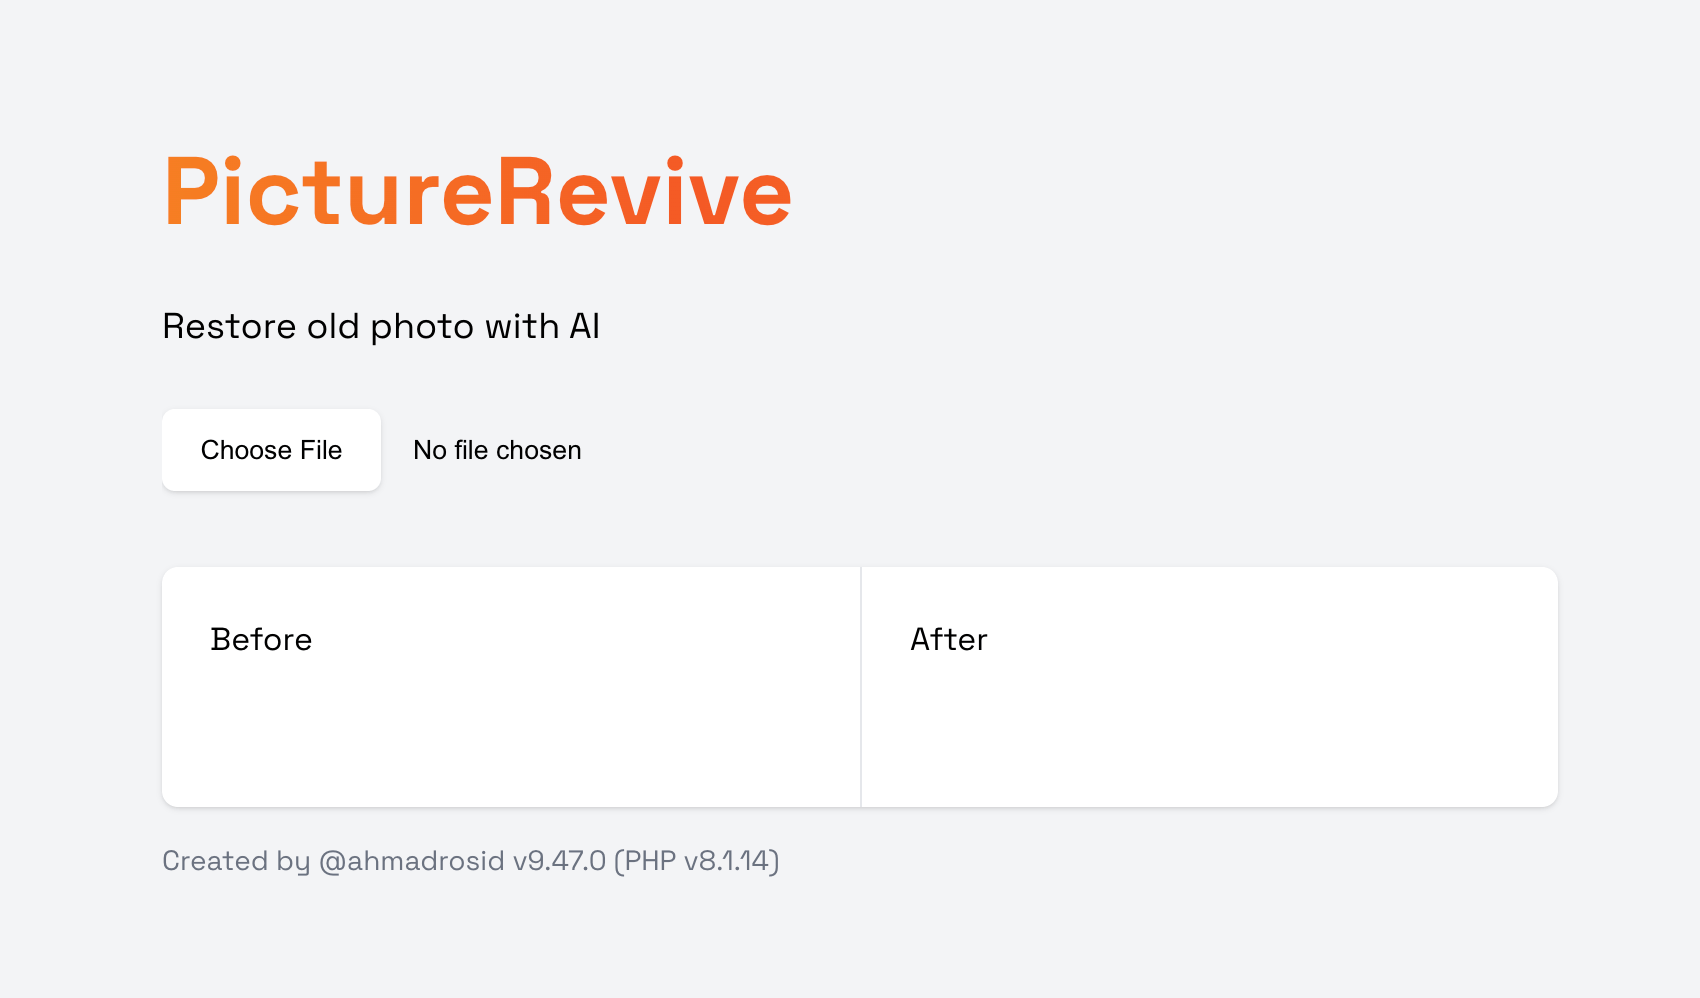
Now let's write some HTML code to create an UI like this.

<div class="flex justify-center pt-8 sm:justify-start sm:pt-0">
    <div>
        <div>
            <p class="title-text">PictureRevive</p>
        </div>
        <div class="dark:text-white">
            <p class="text-lg">Restore old photo with AI</p>
            <form>
                <input type="file" id="file" accept="image/*" />
            </form>
        </div>
    </div>
</div>

<div class="mt-8 bg-white dark:bg-gray-800 overflow-hidden shadow sm:rounded-lg dark:text-white">
    <div class="grid grid-cols-1 md:grid-cols-2">
        <div class="p-6">
            Before
            <div class="pt-6">
                <img id="original" width="300" />
                <button id="upload-btn" class="btn-download border-gray-200 dark:border-gray-700">Upload new photo</button>
            </div>
        </div>

        <div class="p-6 border-t border-gray-200 dark:border-gray-700 md:border-t-0 md:border-l">
            <div>
                After
                <div class="pt-6">
                    <img id="result" width="300"/>
                    <div id="result-container"></div>
                    <button id="download-btn" class="btn-download border-gray-200 dark:border-gray-700">Download</button>
                </div>
            </div>
        </div>
    </div>
</div>
Upload Image
Before we uploading the image to our backend let's add some javascript dependencies to compress image, call API and save a file.
<script src="https://cdn.jsdelivr.net/npm/browser-image-compression@2.0.0/dist/browser-image-compression.js"></script>
<script src="https://unpkg.com/axios@1.2.2/dist/axios.min.js"></script>
<script src="https://unpkg.com/file-saver@2.0.5/dist/FileSaver.min.js"></script>
Now let's listen to input file changes and the compress image and then upload to out backend.
const fileInput = document.getElementById('file');
const originalImage = document.getElementById('original');
const loadingContainer = document.querySelector("#result-container");

const options = {
    maxSizeMB: 1,
    maxWidthOrHeight: 1920,
    useWebWorker: true
};

const handleFileChange = async (event) => {
    try {
        const file = event.target.files[0];
        loadingContainer.innerHTML = '<div class="spinner mx-auto spinner-round my-16"></div>';
        const compressedFile = await imageCompression(file, options);
        originalImage.src = URL.createObjectURL(file);
        const formData = new FormData();
        formData.append('photo', compressedFile, compressedFile.name);
        const response = await axios.post('/', formData);
        await getStatus(response.data.result.id);
    } catch (err) {
        loadingContainer.innerHTML = `<p class="py-8 text-2xl text-red-500">${err.message}</p>`;
    }
}
fileInput.addEventListener('change', handleFileChange);
After we finish upload the image we need to wait for the AI prediction is done.
async function getStatus(id) {
    const res = await axios.get('/status/' + id);
    if (res.data.status !== "succeeded") {
        setTimeout(async () => {
            await getStatus(id);
        }, 1000);
    } else {
        displayResult({ result: res.data.output })
    }
}
Now display the result and implement the download button.
function displayResult(data) {
    const imgResult = document.querySelector("#result");
    const loadingContainer = document.querySelector("#result-container")
    imgResult.src = data.result;
    imgResult.style.display = 'block';
    loadingContainer.innerHTML = "";

    const downloadBtn = document.getElementById('download-btn');
    const uploadBtn = document.getElementById('upload-btn');
    downloadBtn.style.display = 'block';
    uploadBtn.style.display = 'block';

    downloadBtn.addEventListener("click", () => saveAs(
        document.querySelector("#result").src, "output.png"
    ));

    uploadBtn.addEventListener("click", () => {
        imgResult.src = '';
        imgResult.style.display = 'none';
        downloadBtn.style.display = 'none';
        uploadBtn.style.display = 'none';
        fileInput.click();
    });
}
Conclusion
In this tutorial, we have learnt how to use CodeFormer to restore old photos in our Laravel application. We also learnt how to use Replicate API to run our machine learning model in a cheaper way.
It is even easier to use AI replication on a Laravel project, so go ahead and create a project that uses AI. Thanks for reading and happy coding!