One of the limitations of the GPT model by OpenAI is that its knowledge is limited. As of the writing of this blog post, the cut-off date for the GPT-3 model is September 2021. A lot has changed since then. For example, if you ask ChatGPT about the OpenAI package for Laravel, it will not know the answer.
To solve this issue, OpenAI provides us with the Embedding API. Embedding is the process of representing words or phrases in a numerical format that can be easily understood by computer algorithms. In this case, OpenAI will give us vector data for any text that we send to the Embedding API.
Today, we will learn to use OpenAI embeddings to build a chatbot app. Here is the demo app we will create.
Embedding
Embedding is a powerful technique for representing words and phrases as vectors of numbers. This can be used for a variety of tasks, such as creating chatbots that can understand and respond to natural language, natural language processing, and machine learning. Embedding can be used for the following purposes:
- Natural language processing (NLP)
- Text classification
- Sentiment analysis
- Recommendation systems
- Image classification
- Speech recognition
- Machine translation
- Anomaly detection
- Fraud detection
- Time series forecasting
Embeddings themselves will not help us build a chatbot, but they play a critical role in the process. In this tutorial, we will learn how to use embeddings to collect and retrieve data that can be used to improve GPT's knowledge.
Architecture
To build our chatbot application we will define two process here.
1. Embedding Process
The embedding process will be :
- User Submit Web Link
- Crawl Web Link get html text
- Convert Html Content to Markdown
- Split into 200-word chunks
- Convert 200-word chunks to vector
- Save the vector to database

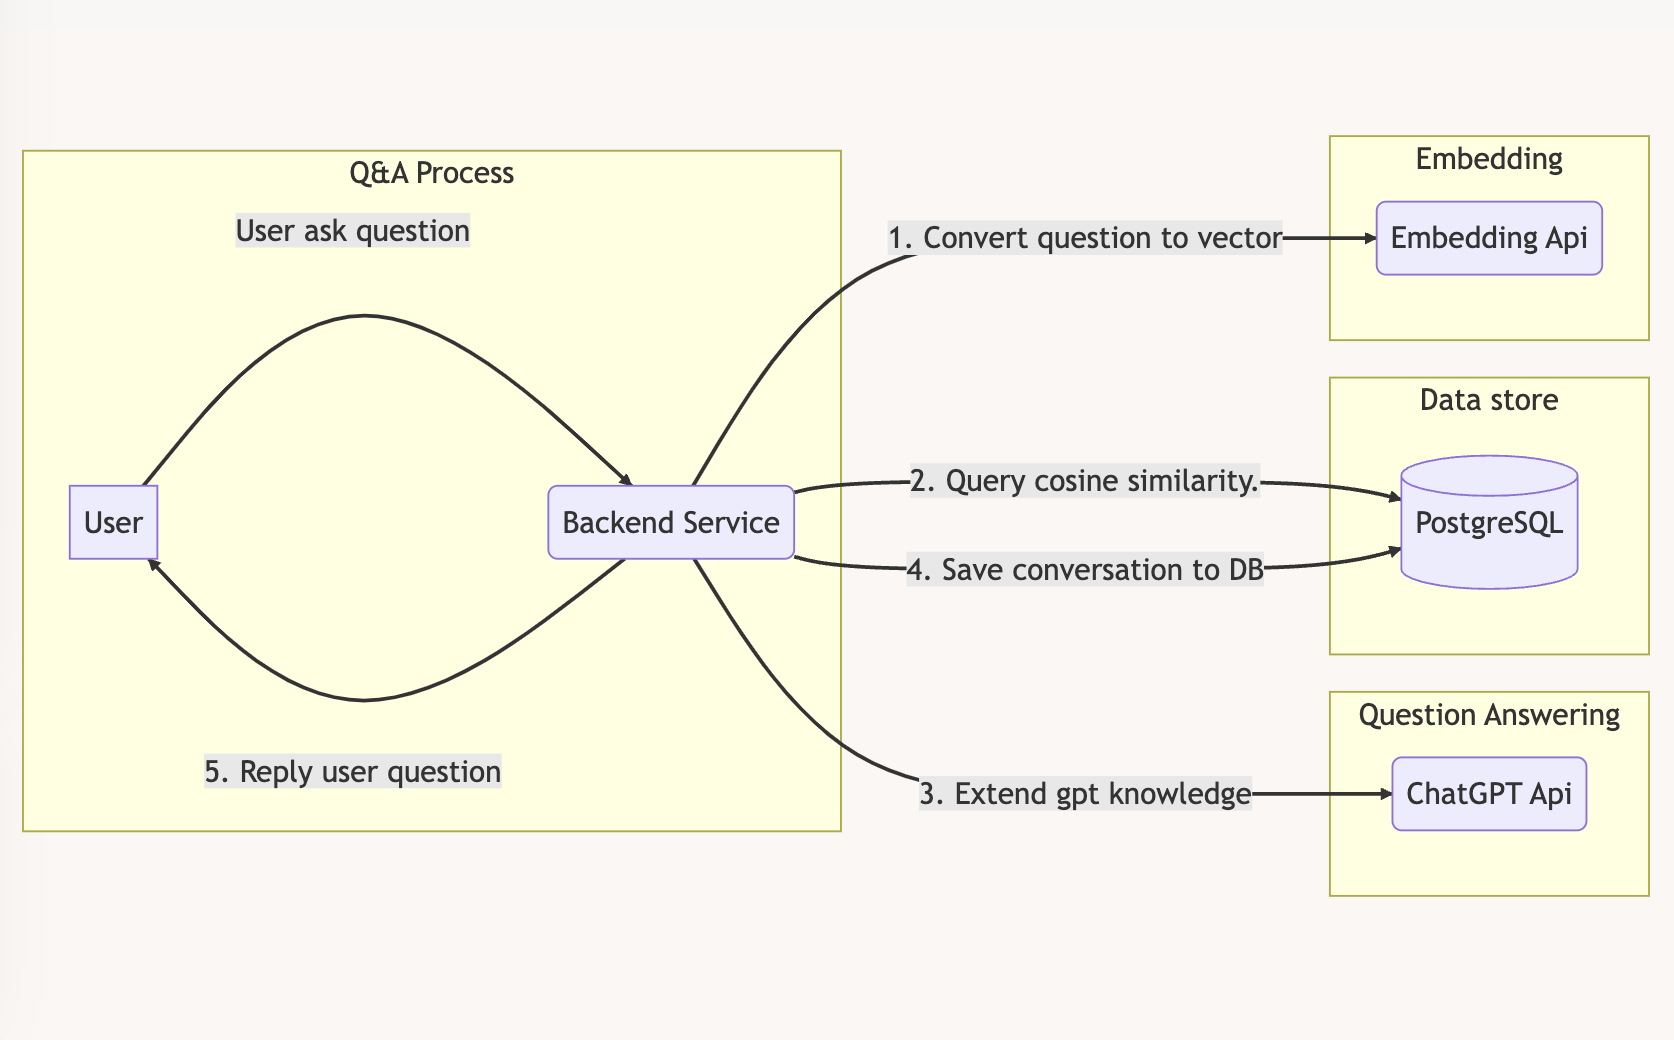
2. Q&A Process
The question answering process will be:
- User asking question
- Convert user questino to vector
- Use the vector to search cosine similarity to postgresql then get 200-word chunks.
- Use 200-word chunks to extend gpt knowledge
- Prompt chat gpt api to answer user question with the given extended knowledge
PostgreSQL with pgvector
Before we start coding, let's discuss a crucial component of our application: the vector store.
Why we need vector in the first place?
In word embedding, a vector is a numerical representation of a word. Each word is assigned a vector that has a fixed length, typically 100 or 300 dimensions. The vectors are learned from a large corpus of text, and they are designed to capture the semantic meaning of the words.
For example, the word laravel might be represented by the vector [-0.008258756,-0.0013013951,-0.009507016,-0.01033694,...]. The values in the vector are not meaningful in themselves, but they are designed to be similar for words that have similar meanings. For example, the word php might be represented by a vector that is very similar to the vector for laravel.
Vector search with Cosine similarity
After we have vector data now it's time to query that vector data, openai recomend us to use cosine similarity search. Cosine similarity is a measure of similarity between two non-zero vectors in a multi-dimensional space.
The formula for cosine similarity can be expressed as:
cosine_similarity(A, B) = dot_product(A, B) / (norm(A) * norm(B))Here:
- A and B are vectors.
- dot_product(A, B) represents the dot product (also known as the inner product) of vectors A and B.
- norm(A) and norm(B) represent the Euclidean norm (magnitude) of vectors A and B, respectively.
Here's example code in php.
<?php

function dot($vector_a, $vector_b) // dot product
{
    $product = 0;
    $length = count($vector_a);
    for ($i = 0; $i < $length; $i++) {
        $product += $vector_a[$i] * $vector_b[$i];
    }
    return $product;
}

function norm($vector) // euclidean norm
{
    $norm = 0.0;
    $length = count($vector);
    for ($i = 0; $i < $length; $i++) {
        $norm += $vector[$i] * $vector[$i];
    }

    return sqrt($norm);
}

function cosine_similarity($vector_a, $vector_b)
{
    $dot_product = dot($vector_a, $vector_b);
    $norm_a = norm($vector_a);
    $norm_b = norm($vector_b);
    echo "norm_a: $norm_a\nnorm_b: $norm_b\n";
    $similarity = $dot_product / ($norm_a * $norm_b);
    return $similarity;
}

$vector1 = array(1, 2, 3);
$vector2 = array(4, 5, 6);

$similarity_score = cosine_similarity($vector1, $vector2);
echo "Cosine Similarity: {$similarity_score}\n";
Learn more about cosine similarity here.
Vector Database
Well implementing cosine similarity search is easy but if we manage a lot of data with it would be better if let database manage all of it. There's a lot of vector database we can choose these days:
- Pinecone, a fully managed vector database
- Weaviate, an open-source vector search engine
- Redis as a vector database
- Qdrant, a vector search engine
- Milvus, a vector database built for scalable similarity search
- Chroma, an open-source embeddings store
- Typesense, fast open source vector search
- Zilliz, data infrastructure, powered by Milvus
- PgVector, Postgres plugin
Since we are using laravel we will choose pgvector since laravel already support PostgreSQL, we just need to install pgvector plugin right away.
To install pgvector follow this command:
cd /tmp
git clone --branch v0.4.2 https://github.com/pgvector/pgvector.git
cd pgvector
make
make install # may need sudo
If you are using mac you can use brew to install pgvector.
brew install pgvectorSetup Project
Let's create new laravel project, we will name it ChatifySite.
laravel new ChatifySiteInstall openai package for larave.
composer require openai-php/laravel --with-all-dependenciesPublish openai config.
php artisan vendor:publish --provider="OpenAI\Laravel\ServiceProvider"Add this env variable on your .env file.
OPENAI_API_KEY=sk-...We also will use tailwindcss to styling our UI. Install it with this command.
npm install -D tailwindcss postcss autoprefixer
npx tailwindcss init -p
Edit tailwind.config.js to:
/** @type {import('tailwindcss').Config} */
module.exports = {
  content: [
    "./resources/**/*.blade.php",
    "./resources/**/*.js",
    "./resources/**/*.vue",
  ],
  theme: {
    extend: {},
  },
  plugins: [],
};
Now edit resource/css/app.css:
@tailwind base;
@tailwind components;
@tailwind utilities;
Lastly, in the resources/view/app.blade.php file or any other relevant view file, remember to include the Vite links for CSS and JS resources.
<!DOCTYPE html>
<html lang="{{ str_replace('_', '-', app()->getLocale()) }}">
  <head>
    <meta charset="utf-8" />
    <meta name="viewport" content="width=device-width, initial-scale=1" />

    <title>ChatifySite</title>
    @vite('resources/css/app.css') @vite('resources/js/app.js')
  </head>
</html>
To begin developing the UI, simply run npm run dev. Once you have completed the development process, be sure to execute npm run build in order to generate all the necessary CSS and JS files.
Creating Migration
Now let's add few migration to setup our pgvector plugin and some other table we need.
First let's add migration to enable pgvector extension.
php artisan make:migration add_vector_extension_to_postgresqlHere's the schema migration for adding vector extension.
<?php
use Illuminate\Database\Migrations\Migration;
use Illuminate\Support\Facades\DB;
return new class extends Migration
{
/**
* Run the migrations.
*/
public function up(): void
{
DB::statement("CREATE EXTENSION IF NOT EXISTS vector;");
}
/**
* Reverse the migrations.
*/
public function down(): void
{
}
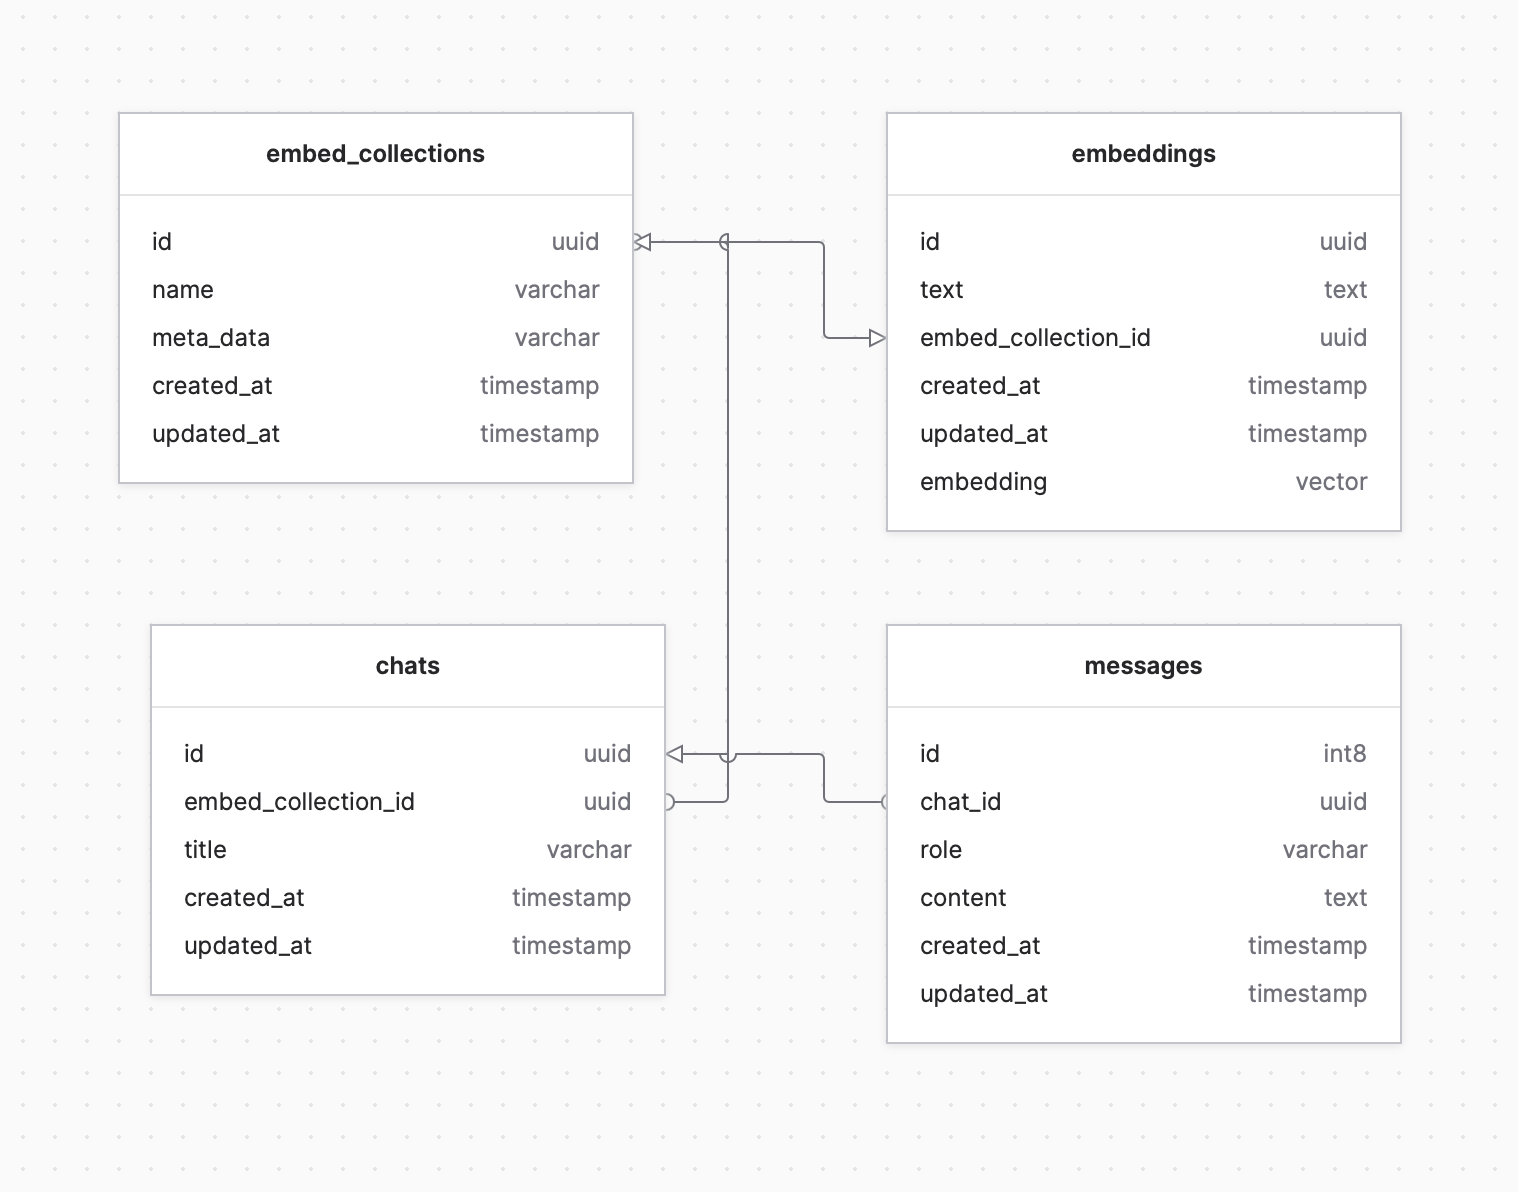
};Before we proceed with the next migration, let's design the database table for this application. Here are the requirements for our database:
- Ability to index multiple links.
- Ability to chat specifically with indexed links.
- Ability to view the history of messages and chats.
With this requirement we will create 4 table.
embed_collections: To store multiple links.embeddings: To store all vector data.chats: To chat history.messages: To store all history conversation of each chats.
And with all that here's the ERD diagram for our database.
To generate migration for this we can run php artisan command like this.
php artisan make:model EmbedCollection Embedding Chat Message -mNow for EmbedCollection migration schema will be like this.
Schema::create('embed_collections', function (Blueprint $table) {
    $table->uuid("id")->primary();
    $table->string("name");
    $table->string("meta_data");
    $table->timestamps();
});
Then for Embedding:
public function up(): void
{
    Schema::create('embeddings', function (Blueprint $table) {
        $table->uuid("id")->primary();
        $table->longText('text');
        $table->foreignIdFor(EmbedCollection::class)->onDelete('cascade');
        $table->timestamps();
    });
    DB::statement("ALTER TABLE embeddings ADD embedding vector;");
}
Next for Chat:
Schema::create('chats', function (Blueprint $table) {
    $table->uuid("id")->primary();
    $table->foreignIdFor(EmbedCollection::class)->onDelete('cascade');
    $table->string("title")->nullable();
    $table->timestamps();
});
And the last for Message:
Schema::create('messages', function (Blueprint $table) {
    $table->id();
    $table->foreignIdFor(Chat::class)->onDelete('cascade');
    $table->string("role");
    $table->text("content");
    $table->timestamps();
});
Now let's setup some config to our model, this will help us to work with data we have later.
This for EmbedCollection, in this model we need to disable auto increment id and auto filed uuid for id column:
<?php

namespace App\Models;

use Illuminate\Database\Eloquent\Factories\HasFactory;
use Illuminate\Database\Eloquent\Model;
use Illuminate\Database\Eloquent\Relations\HasMany;
use Ramsey\Uuid\Uuid;

class EmbedCollection extends Model
{
    use HasFactory;

    public $fillable = ['name', 'meta_data'];
    public $incrementing = false;
    public $keyType = "string";

    protected static function booted()
    {
        static::creating(function ($model) {
            $model->id = Uuid::uuid4()->toString();
        });
    }

    public function toArray()
    {
        $this->meta_data = json_decode($this->meta_data);
        return $this;
    }
}
And enable uuid for Embedding model:
<?php

...
use Ramsey\Uuid\Uuid;

class Embedding extends Model
{
    use HasFactory;

    public $fillable = ['embed_collection_id', 'text', 'embedding'];
    public $incrementing = false;

    protected static function booted()
    {
        static::creating(function ($model) {
            $model->id = Uuid::uuid4()->toString();
        });
    }
}
For Chat we need to enable uuid and relationship belongs to EmbedCollection:
<?php

namespace App\Models;

use Illuminate\Database\Eloquent\Factories\HasFactory;
use Illuminate\Database\Eloquent\Model;
use Illuminate\Database\Eloquent\Relations\BelongsTo;
use Ramsey\Uuid\Uuid;

class Chat extends Model
{
    use HasFactory;

    public $fillable = ['embed_collection_id', 'title'];
    public $incrementing = false;

    protected static function booted()
    {
        static::creating(function ($model) {
            $model->id = Uuid::uuid4()->toString();
        });
    }

    public function embed_collection(): BelongsTo
    {
        return $this->belongsTo(EmbedCollection::class);
    }
}
Collecting Data
Now that our database is ready we can start creating helper class to collecting data that we will embed. Before we start let's install some package that we will use to scrape html and turn it to markdown document.
composer require symfony/dom-crawler
composer require guzzlehttp/guzzle
composer require league/html-to-markdown
Next create file app/Service/Scrape.php:
<?php
namespace App\Service;
use GuzzleHttp\Client;
use Illuminate\Support\Facades\Log;
use League\HTMLToMarkdown\HtmlConverter;
use Symfony\Component\DomCrawler\Crawler;
class Scrape
{
public $title;
private $converter;
public function __construct()
{
$this->converter = new HtmlConverter(array(
'strip_tags' => true,
'strip_placeholder_links' => true
));
}
private function removeHrefAttribute($htmlString)
{
$pattern = '/<a\b[^>]*\bhref\s*=\s*"[^"]*"[^>]*>/i';
$replacement = '<a>';
$result = preg_replace($pattern, $replacement, $htmlString);
return $result;
}
private function cleanHtml($htmlContent)
{
// The content inside this tag is usually is not useful
// Clean tags: <style> <script> <span> <footer> <aside> <nav> <picture> <svg> <form>
$cleanHtml = preg_replace('/<script\b[^>]*>(.*?)<\/script>/is', '', $htmlContent);
$cleanHtml = preg_replace('/<style\b[^>]*>(.*?)<\/style>/is', '', $cleanHtml);
$cleanHtml = preg_replace('/<svg\b[^>]*>(.*?)<\/svg>/is', '', $cleanHtml);
$cleanHtml = preg_replace('/<picture\b[^>]*>(.*?)<\/picture>/is', '', $cleanHtml);
$cleanHtml = preg_replace('/<form\b[^>]*>(.*?)<\/form>/is', '', $cleanHtml);
$cleanHtml = preg_replace('/<footer\b[^>]*>(.*?)<\/footer>/is', '', $cleanHtml);
$cleanHtml = preg_replace('/<nav\b[^>]*>(.*?)<\/nav>/is', '', $cleanHtml);
$cleanHtml = preg_replace('/<span[^>]*>(.*?)<\/span>/is', '$1', $cleanHtml);
$cleanHtml = $this->removeHrefAttribute($cleanHtml);
return trim($cleanHtml);
}
private function reverseLTGT($input)
{
$output = str_replace('<', '<', $input);
$output = str_replace('>', '>', $output);
return $output;
}
public function handle($url)
{
$url = $url;
$client = new Client();
$response = $client->get($url, [
'headers' => [
'User-Agent' => 'Mozilla/5.0 (Windows NT 10.0; Win64; x64) AppleWebKit/537.36 (KHTML, like Gecko) Chrome/91.0.4472.124 Safari/537.36',
'Accept-Encoding' => 'gzip',
],
]);
$htmlContent = $response->getBody()->getContents();
$cleanHtml = $this->cleanHtml($htmlContent);
$this->converter->getEnvironment()->addConverter(new PreTagConverter());
$markdownContent = $this->converter->convert($cleanHtml);
$markdownContent = $this->reverseLTGT($markdownContent);
// Usefull for debugging.
// Log::info($cleanHtml);
// Log::info($markdownContent);
try {
$dom = new Crawler($htmlContent);
$this->title = $dom->filter('title')->first()->text();
} catch (\Exception $e) {
$this->title = substr($markdownContent, 0, strpos($markdownContent, "\n"));
}
return $markdownContent;
}
}Since we use use league/html-to-markdown and the result of pre code converter still outputing the html text we need to adjust it a little bit to only return the text only.
Create file app/Service/PreTagConverter.php:
<?php

namespace App\Service;

use League\HTMLToMarkdown\Converter\ConverterInterface;
use League\HTMLToMarkdown\ElementInterface;

class PreTagConverter implements ConverterInterface
{
    public function convert(ElementInterface $element): string
    {
        $preContent = \html_entity_decode($element->getChildrenAsString());
        $preContent = strip_tags($preContent, 'pre');
        $preContent = \str_replace(['<pre>', '</pre>'], '', $preContent);

        /*
         * Checking for the code tag.
         * Usually pre tags are used along with code tags. This conditional will check for already converted code tags,
         * which use backticks, and if those backticks are at the beginning and at the end of the string it means
         * there's no more information to convert.
         */

        $firstBacktick = \strpos(\trim($preContent), '`');
        $lastBacktick  = \strrpos(\trim($preContent), '`');
        if ($firstBacktick === 0 && $lastBacktick === \strlen(\trim($preContent)) - 1) {
            return $preContent . "\n\n";
        }

        // If the execution reaches this point it means it's just a pre tag, with no code tag nested

        // Empty lines are a special case
        if ($preContent === '') {
            return "```\n```\n\n";
        }


        // Normalizing new lines
        $preContent = \preg_replace('/\r\n|\r|\n/', "\n", $preContent);
        \assert(\is_string($preContent));

        // Ensure there's a newline at the end
        if (\strrpos($preContent, "\n") !== \strlen($preContent) - \strlen("\n")) {
            $preContent .= "\n";
        }

        // Use three backticks
        return "```\n" . $preContent . "```\n\n";
    }

    /**
     * @return string[]
     */
    public function getSupportedTags(): array
    {
        return ["pre"];
    }
}
Next app/Service/Tokenizer.php, this class will be used to split the text to given chunk size:
<?php

namespace App\Service;

class Tokenizer
{
    public function tokenize($text, $chunk)
    {
        $normalizedText = preg_replace("/\n+/", "\n", $text);
        $words = explode(' ', $normalizedText);
        $words = array_filter($words);
        $result = array_chunk($words, $chunk);
        return $result;
    }
}
Since we will streaming the response from openai to client let's also create a helper to send stream text in app/Helper/ServerEvent.php:
<?php

namespace App\Helpers;

class ServerEvent
{
    public static function send($data, $new_line = "\n")
    {
        echo "{$data}{$new_line}";
        ob_flush();
        flush();
    }
}
Finnaly let's write text class helper to get embedding vector from the given text and prompt to add additional knowledge to chat gpt api.
Create file app/Service/QueryEmbedding.php:
<?php

namespace App\Service;

use Exception;
use Illuminate\Support\Facades\Log;
use OpenAI\Laravel\Facades\OpenAI;

class QueryEmbedding
{

    public function getQueryEmbedding($question): array
    {
        $result = OpenAI::embeddings()->create([
            'model' => 'text-embedding-ada-002',
            'input' => $question,
        ]);

        if (count($result['data']) == 0) {
            throw new Exception("Failed to generated query embedding!");
        }

        return $result['data'][0]['embedding'];
    }

    public function askQuestionStreamed($context, $question)
    {
        $system_template = "
        Use the following pieces of context to answer the users question.
        If you don't know the answer, just say that you don't know, don't try to make up an answer.
        ----------------
        {context}
        ";
        $system_prompt = str_replace("{context}", $context, $system_template);

        return Openai::chat()->createStreamed([
            'model' => 'gpt-3.5-turbo',
            'temperature' => 0.8,
            'messages' => [
                ['role' => 'system', 'content' => $system_prompt],
                ['role' => 'user', 'content' => $question],
            ],
        ]);
    }
}
Embedding Html Content
Next, we'll develop a controller responsible for managing the embedding process. In this controller, users can submit a request with a link, and we will seamlessly stream the processing updates back to them.
First let's create new controller unsing this command:
php artisan make:controller EmbeddingControllerThen register the controller to routes/web.php:
Route::post("/embedding", [EmbeddingController::class, 'store']);The logic in our controller would be 3 step.
- Scrape the web links
$markdown = $this->scraper->handle($url);- Tokenize the markdown file into 200-chunk words
$tokens = $this->tokenizer->tokenize($markdown, 200);- Generate embedding of 200-chunk words
foreach ($tokens as $token) {
    $total++;
    $text = implode("\n", $token);
$vectors = $this->query->getQueryEmbedding($text);- Save the 200-chunk words
foreach ($tokens as $token) {
    ...
    Embedding::create([
        'embed_collection_id' => $collection->id,
        'text' => $text,
        'embedding' => json_encode($vectors)
    ]);
}- Stream all the steps to client
foreach ($tokens as $token) {
    ...
    ServerEvent::send("Indexing: {$title}, {$total} of {$count} elements.");

    if (connection_aborted()) {
        break;
    }
}
Here is the complete implementation of this controller.
class EmbeddingController extends Controller
{
    protected Scrape $scraper;
    protected Tokenizer $tokenizer;
    protected QueryEmbedding $query;

    public function __construct(Scrape $scrape, Tokenizer $tokenizer, QueryEmbedding $query)
    {
        $this->scraper = $scrape;
        $this->tokenizer = $tokenizer;
        $this->query = $query;
    }

    public function store(Request $request)
    {
        $url = $request->link;
        return response()->stream(function () use ($url) {
            try {
                ServerEvent::send("Start crawling: {$url}");
                $markdown = $this->scraper->handle($url);
                $tokens = $this->tokenizer->tokenize($markdown, 200);

                $title = $this->scraper->title;
                $count = count($tokens);
                $total = 0;
                $collection = EmbedCollection::create([
                    'name' => $title,
                    'meta_data' => json_encode([
                        'title' => $title,
                        'url' => $url,
                    ]),
                ]);

                foreach ($tokens as $token) {
                    $total++;
                    $text = implode("\n", $token);
                    $vectors = $this->query->getQueryEmbedding($text);
                    Embedding::create([
                        'embed_collection_id' => $collection->id,
                        'text' => $text,
                        'embedding' => json_encode($vectors)
                    ]);
                    ServerEvent::send("Indexing: {$title}, {$total} of {$count} elements.");

                    if (connection_aborted()) {
                        break;
                    }
                }
                sleep(1);
                $chat = Chat::create(['embed_collection_id' => $collection->id]);
                ServerEvent::send(route("chat.show", $chat->id));
            } catch (Exception $e) {
                Log::error($e);
                ServerEvent::send("Embedding failed");
            }
        }, 200, [
            'Cache-Control' => 'no-cache',
            'Connection' => 'keep-alive',
            'X-Accel-Buffering' => 'no',
            'Content-Type' => 'text/event-stream',
        ]);
    }
}
On the UI side we are going to provide the form for user to submit link. This would be in resources/views/welcome.blade.php:
Before that don't forget to register a route for this view in routes/web.php :
Route::view("/", "welcome");Add this form to welcome view :
<div>
  <p id="progress-text" class="text-gray-500"></p>
  <form class="flex gap-2" id="form-submit-link">
    @csrf
    <input
      placeholder="Paste any link..."
      class="w-full p-2 rounded-md border border-gray-600"
      name="link"
    />
    <button
      id="btn-submit-indexing"
      type="submit"
      class="bg-black text-white px-3 rounded-md inline-flex items-center gap-2"
    >
      <span>Submit</span>
    </button>
  </form>
</div>
Since we only using vanilla javascript to make our UI interactive we will first define simple component for dynamic rendering on our UI.
Edit file resources/js/app.js :
const components = {
  loadingDots: `<span class="loading">
    <span style="background-color: #fff;"></span>
    <span style="background-color: #fff;"></span>
    <span style="background-color: #fff;"></span>
    </span>`,
  thinking:
    '<span class="animate-pulse text-gray-600 text-sm">Tinking...</span>',
  chat_user: `
    <div class="ml-16 flex justify-end">
        <di class="bg-gray-100 p-3 rounded-md">
            <p class="font-medium text-blue-500 text-right text-sm">Question</p>
            <hr class="my-2" />
            <p class="text-gray-800">{content}</p>
        </di>
    </div>`,
  chat_bot: `
    <div class="bg-gray-100 p-2 rounded-md mr-16">
        <p class="font-medium text-blue-500 text-sm">Answer</p>
        <hr class="my-2" />
        <div class="text-gray-800" id="{id}">{content}</div>
    </div>`,
};
On some helper function to generate random string and checking is url valid.
function isUrl(string) {
  try {
    new URL(string);
    return true;
  } catch (error) {
    return false;
  }
}

function getId(length = 6) {
  const characters =
    "ABCDEFGHIJKLMNOPQRSTUVWXYZabcdefghijklmnopqrstuvwxyz0123456789";
  let result = "";

  for (let i = 0; i < length; i++) {
    const randomIndex = Math.floor(Math.random() * characters.length);
    result += characters.charAt(randomIndex);
  }

  return result;
}
Still resources/js/app.js file and add form submit listener logic.
const formSubmitLink = document.getElementById("form-submit-link");
if (formSubmitLink) handleSubmitIndexing(formSubmitLink);

function handleSubmitIndexing(form) {
  form.addEventListener("submit", (e) => {
    e.preventDefault();
    const link = e.target.link.value;
    const token = e.target._token.value;
    const progress = document.getElementById("progress-text");
    const btn = document.getElementById("btn-submit-indexing");
    progress.style.paddingBottom = "8px";
    btn.innerHTML = components.loadingDots;

    if (!link) return;
    const body = { link };
    fetch("/embedding", {
      headers: {
        "Content-Type": "application/json",
        "X-Requested-With": "XMLHttpRequest",
        "X-CSRF-Token": token,
      },
      method: "POST",
      body: JSON.stringify(body),
    })
      .then(async (res) => {
        const reader = res.body.getReader();
        const decoder = new TextDecoder();

        let text = "";
        while (true) {
          const { value, done } = await reader.read();
          if (done) break;
          text = decoder.decode(value, { stream: true });
          progress.innerText = text;
        }

        if (isUrl(text)) {
          window.location = text;
        } else {
          progress.innerText = "";
          progress.style.borderBottom = 0;
        }

        btn.innerHTML = `Submit`;
      })
      .catch((e) => {
        console.error(e);
      });
  });
}
The Chatbot
Now let's add new controller to handle question and answering.
php artisan make:controller MessageControllerThen register this controller to routes/web.php:
Route::get('/chat/{id}', [MessageController::class, 'show']);
Route::post('/chat', [MessageController::class, 'store']);
The logic for this message controller would be like this.
- Convert user question to vector
$question = $request->question;
$queryVectors = $this->query->getQueryEmbedding($question);
$vector = json_encode($queryVectors);- Use vector data to query the embedding table
$result = DB::table('embeddings')
    ->select("text")
    ->selectSub("embedding <=> '{$vector}'::vector", "distance")
    ->where('embed_collection_id', $chat->embed_collection->id)
    ->orderBy('distance', 'asc')
    ->limit(2)
->get();- Use the text data from embedding table as system prompt
$context = collect($result)->map(function ($item) {
    return $item->text;
})->implode("\n");

$stream = $this->query->askQuestionStreamed($context, $question);- Stream the response from chat gpt api to client
$resultText = "";
foreach ($stream as $response) {
    $text = $response->choices[0]->delta->content;
    $resultText .= $text;
    if (connection_aborted()) {
        break;
    }
    ServerEvent::send($text, "");
}- Save conversation to database
Message::insert([[
    'chat_id' => $chat_id,
    'role' => Message::ROLE_USER,
    'content' => $question
], [
    'chat_id' => $chat_id,
    'role' => Message::ROLE_BOT,
    'content' => $resultText
]]);
With all of that here's the full message controller :
class MessageController extends Controller
{
    protected QueryEmbedding $query;

    public function __construct(QueryEmbedding $query)
    {
        $this->query = $query;
    }

    public function index()
    {
        return view('chat', [
            'chats' => Chat::with('embed_collection')->orderBy('created_at', 'desc')->get()
        ]);
    }

    public function show($id)
    {
        $chat = Chat::with('embed_collection')->find($id);
        return view('conversation', [
            'chat' => $chat,
            'embed_collection' => $chat->embed_collection->toArray(),
            'messages' => Message::query()->where('chat_id', $chat->id)->get()
        ]);
    }

    public function store(Request $request)
    {
        return response()->stream(function () use ($request) {
            try {
                $chat_id = $request->chat_id;
                $chat = Chat::with('embed_collection')->find($chat_id);
                $question = $request->question;
                $queryVectors = $this->query->getQueryEmbedding($question);
                $vector = json_encode($queryVectors);
                $result = DB::table('embeddings')
                    ->select("text")
                    ->selectSub("embedding <=> '{$vector}'::vector", "distance")
                    ->where('embed_collection_id', $chat->embed_collection->id)
                    ->orderBy('distance', 'asc')
                    ->limit(2)
                    ->get();
                $context = collect($result)->map(function ($item) {
                    return $item->text;
                })->implode("\n");

                $stream = $this->query->askQuestionStreamed($context, $question);
                $resultText = "";
                foreach ($stream as $response) {
                    $text = $response->choices[0]->delta->content;
                    $resultText .= $text;
                    if (connection_aborted()) {
                        break;
                    }
                    ServerEvent::send($text, "");
                }
                Message::insert([[
                    'chat_id' => $chat_id,
                    'role' => Message::ROLE_USER,
                    'content' => $question
                ], [
                    'chat_id' => $chat_id,
                    'role' => Message::ROLE_BOT,
                    'content' => $resultText
                ]]);
            } catch (Exception $e) {
                Log::error($e);
                ServerEvent::send("");
            }
        }, 200, [
            'Cache-Control' => 'no-cache',
            'Connection' => 'keep-alive',
            'X-Accel-Buffering' => 'no',
            'Content-Type' => 'text/event-stream',
        ]);
    }
}
Now let's work on the UI part of the chat bot page.
<div class="flex-1 min-w-0">
  <div>
    @foreach($chats as $chat)
    <div class="pb-6">
      <p class="text-gray-600 text-sm">
        {{$chat->embed_collection->created_at->diffForHumans()}}
      </p>
      <p class="text-gray-800 font-medium">
        <a class="hover:underline" href="{{route('chat.show', $chat->id)}}">
          {{$chat->embed_collection->name}}
        </a>
      </p>
    </div>
    @endforeach
    <p id="progress-text" class="text-gray-600"></p>
  </div>
  <form class="flex gap-2" id="form-submit-link">
    @csrf
    <input
      placeholder="Paste any link..."
      class="w-full p-2 rounded-md border border-gray-600"
      name="link"
    />
    <button
      id="btn-submit-indexing"
      type="submit"
      class="bg-black px-3 rounded-md inline-flex items-center gap-2"
    >
      <span class="text-white">Submit</span>
    </button>
  </form>
</div>
And here's javascript to handle the submit event and streaming response on resources/js/app.js.
const formQuestion = document.getElementById("form-question");
if (formQuestion) handleSubmitQuestion(formQuestion);

function handleSubmitQuestion(form) {
  form.addEventListener("submit", (e) => {
    e.preventDefault();
    const question = e.target.question.value;
    const chat_id = e.target._chat_id.value;
    const token = e.target._token.value;
    const btn = document.getElementById("btn-submit-question");
    const messages = document.getElementById("messages");
    btn.innerHTML = components.loadingDots;
    e.target.question.value = "";

    messages.innerHTML += components.chat_user.replace("{content}", question);

    const answerComponentId = getId();
    messages.innerHTML += components.chat_bot
      .replace("{content}", "")
      .replace("{id}", answerComponentId);

    const answerComponent = document.getElementById(answerComponentId);
    answerComponent.innerHTML = components.thinking;

    if (!question) return;
    const body = { question, chat_id };
    fetch("/chat", {
      headers: {
        "Content-Type": "application/json",
        "X-Requested-With": "XMLHttpRequest",
        "X-CSRF-Token": token,
      },
      method: "POST",
      body: JSON.stringify(body),
    })
      .then(async (res) => {
        answerComponent.innerHTML = "";
        const reader = res.body.getReader();
        const decoder = new TextDecoder();

        let text = "";
        while (true) {
          const { value, done } = await reader.read();
          if (done) break;
          text += decoder.decode(value, { stream: true });
          answerComponent.innerHTML = await markdownToHtml(text);
        }

        btn.innerHTML = `Submit`;
      })
      .catch((e) => {
        console.error(e);
      });
  });
}
To enhance the appearance of our rendered HTML, one more thing we can do is format the response as markdown text and convert it to HTML.
async function markdownToHtml(markdownString) {
  const { unified } = await import("unified");
  const markdown = (await import("remark-parse")).default;
  const remark2rehype = (await import("remark-rehype")).default;
  const rehypeStringify = (await import("rehype-stringify")).default;

  const result = await unified()
    .use(markdown)
    .use(remark2rehype)
    .use(rehypeStringify)
    .process(markdownString);

  return result.value.toString();
}
Dont' forget to install the dependency for converting markdown to html.
npm install unified remark-parse remark-rehype rehype-stringifyConslusion
I hope this comprehensive article will provide you with a clear understanding of how to effectively utilize OpenAI Embedding in your Laravel project. It's important to note that there is always room for improvement, such as optimizing the crawler section where we extensively employ regex to sanitize the HTML. You can even explore the option of creating your own tokenizer for enhanced customization.
One think you should keep in mind is that embedding is not only used for building chatbot, you can use it for semantic search or recomendation engine and more.