The progress of Open Source Large Language Model is growing rapidly, now if you have a computer with 8 GB of ram you can run llama based large language is your local machine.
Well running LLM in local machine is very easy thanks to ollama that make it easy to download the model and run it in your local computer. Of course we should try to use ollama on our laravel application.
What is Ollama?
Ollama is a lightweight, extensible framework for building and running large language models like Llama 2 and Mistral. It offers a command-line interface and supports integration with JavaScript and Python projects.
Ollama simplifies the process of running language models locally, providing users with greater control and flexibility in their AI projects. It allows users to run open-source large language models locally on their machines and supports a variety of models, including Llama 2, Llama 2-uncensored, Codellama, and many others.
Ollama optimizes setup and configuration details, including GPU usage, and provides a Modelfile that bundles model weights, configuration, and data into a single package.
Why Use Local LLM?
Having a large language model (LLM) running locally instead of relying solely on cloud solutions can be pretty sweet in certain situations. For starters, you get to keep your data nice and cozy within your own systems, which is a major plus for privacy and security - especially if you're dealing with sensitive stuff.
You can use local LLM for any case you like. In my case, I leverage a local LLM to conduct automated research, analyzing data to uncover intriguing insights. These insights then serve as a foundation for creating engaging content for my social media platforms.
Using a local language model means I can run it for free. That way, I don't have to worry about my OpenAI bill going through the roof if I want to play around and experiment with different stuff.
Installing Ollama
Let's install ollama on our machine.
- If you are using mac. Download the desktop app here.
- And if you are using Windows download here
- And for linux you can run this command in your terminal.
curl -fsSL https://ollama.com/install.sh | shOllama is open source project created using golang, if you want to build it manually you can get the source code on Github.
After installing ollama now let's download the model, you can get the list of available model from ollama library model here. But after some trial and error I found that openchat model quite good it has the gpt-3 level. To download it run this command.
ollama pull openchatTo see list of installed model you can run this command.
ollama listhere's mine
NAME                   	ID          	SIZE  	MODIFIED
nomic-embed-text:latest	0a109f422b47	274 MB	27 hours ago
openchat:latest        	537a4e03b649	4.1 GB	47 hours ago
orca-mini:latest       	2dbd9f439647	2.0 GB	47 hours ago
tinyllama:latest       	2644915ede35	637 MB	2 days ago
Use Ollama for Laravel
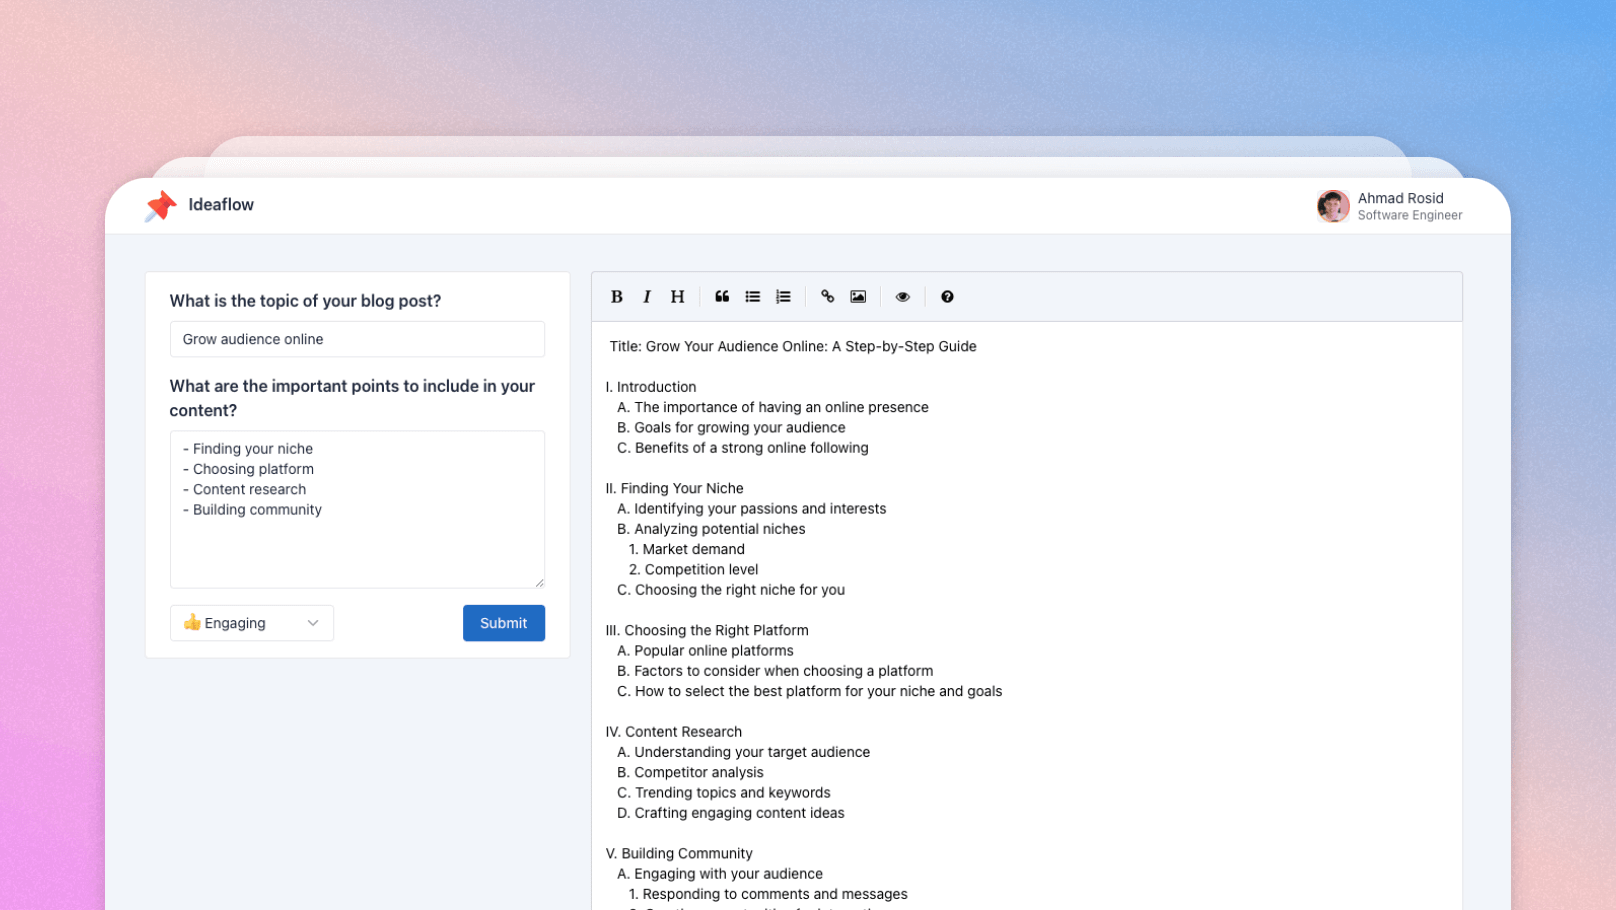
Now let's create some laravel project, this time let's use openchat model to generate blog post outline let's called Ideaflow.
The prompt for our ai outline generator would look like this.
Generate blog post outline.
Title: {title}
Tone: {tone}
Important points to include:
{topic}
Let's create new laravel project using this command.
laravel new ideaflowNow install ollama php client package.
composer require jdecool/ollama-client:dev-mainThen create service class to interact with ollama app/Service/OllamaService.php.
<?php

namespace App\Services;

use JDecool\OllamaClient\Client;
use JDecool\OllamaClient\ClientBuilder;
use JDecool\OllamaClient\Client\Message;
use JDecool\OllamaClient\Client\Request\ChatRequest;

class OllamaService
{
    private Client $client;
    private string $model = 'openchat';

    public function __construct()
    {
        $builder = new ClientBuilder();
        $this->client = $builder->create();
    }

    private function createMessage($questions)
    {
        return new Message($questions['role'], $questions['content']);
    }

    public function ask(array $questions)
    {
        $messages = array_map([$this, 'createMessage'], $questions);
        $request = new ChatRequest($this->model, $messages);
        return $this->client->chatStream($request);
    }
}
First we need model to store the outline generated by ai.
php artisan make:model Outline -mAnd here's the migrations.
Schema::create('outlines', function (Blueprint $table) {
    $table->id();
    $table->string('title');
    $table->text('topic');
    $table->string('tone');
    $table->text('content')->nullable();
    $table->timestamps();
});
Then update the model, we will use the model to generate the prompt that we will sent to ollama.
<?php

namespace App\Models;

use Illuminate\Database\Eloquent\Factories\HasFactory;
use Illuminate\Database\Eloquent\Model;

class Outline extends Model
{
    use HasFactory;

    protected $fillable = ['title', 'topic', 'tone', 'content'];

    public function getPromptMessages()
    {
        $message = [
            "Generate blog post outline.",
            "Title: {$this->title}",
            "Tone: {$this->tone}",
            "Important points to include:",
            "{$this->topic}",
        ];

        return [
            [
                'role' => 'user',
                'content' => implode("\n", $message)
            ]
        ];
    }
}
Now let's create the interface, this time we will just use welcome.blade.php
@section('content')
<div class="mt-3">
    <div class="container">
        <div class="row">
            <div class="col-4">
                <div class="card">
                    <div class="card-body">
                        <form action="{{route('outlines.store')}}" method="POST">
                            @csrf
                            <div>
                                <div class="mb-3">
                                    <div class="h3">What is the topic of your blog post?</div>
                                    <input name="title" class="form-control" value="{{$outline ? $outline->title : ''}}" placeholder="eg. How to make money online" />
                                    @error('title')
                                        <div class="my-1 alert alert-danger">{{ $message }}</div>
                                    @enderror
                                </div>
                                <div class="mb-3">
                                    <div class="h3">What are the important points to include in your content?</div>
                                    <textarea rows="7" name="topic" class="form-control" placeholder="e.g, How to choose the right product for your business">{{$outline ? $outline->topic : ''}}</textarea>
                                    @error('topic')
                                        <div class="my-1 alert alert-danger">{{ $message }}</div>
                                    @enderror
                                </div>
                                <div class="d-flex">
                                    <div>
                                        <select name="tone" class="form-select">
                                            <option value="">Select tones</option>
                                            @foreach($tones as $tone => $label)
                                            @if($tone == $selected_tone)
                                            <option selected value="{{$tone}}">{{$label}} {{$tone}}</option>
                                            @else
                                            <option value="{{$tone}}">{{$label}} {{$tone}}</option>
                                            @endif
                                            @endforeach
                                        </select>
                                        @error('tone')
                                            <div class="my-1 alert alert-danger">{{ $message }}</div>
                                        @enderror
                                    </div>
                                    <div class="ms-auto">
                                        <button id="btn-send" class="btn btn-primary">
                                            <span>Submit</span>
                                        </button>
                                    </div>
                                </div>
                            </div>
                        </form>
                    </div>
                </div>
            </div>
            <div class="col-8">
                <textarea id="editor"></textarea>
            </div>
        </div>
    </div>
</div>
@endsection
Then create new controller to render the view above.
php artisan make:controller HomeControllerIn the HomeController we will prepare the data we need for our view.
<?php

namespace App\Http\Controllers;

use Illuminate\Http\Request;

class HomeController extends Controller
{
    public function index(Request $request)
    {
        $tones = [
            "Formal" => "👔",
            "Friendly" => "🙂",
            "Casual" => "😎",
            "Professional" => "💼",
            "Diplomatic" => "🤝",
            "Confident" => "💪",
            "Middle school" => "📕",
            "High school" => "📗",
            "Academic" => "🎓",
            "Simplified" => "📖",
            "Bold" => "🦄",
            "Empathetic" => "🤗",
            "Luxury" => "💎",
            "Engaging" => "👍",
            "Direct" => "➡️",
            "Persuasive" => "🎯",
        ];

        $outline = $request->session()->get('outline');

        if ($outline) {
            return view('welcome', [
                'outline' => $outline,
                'outline_id' => $outline->id,
                'tones' => $tones,
                'selected_tone' => $outline->tone,
            ]);
        }

        return view('welcome', [
            'tones' => $tones,
            'outline' => null,
            'outline_id' => null,
            'selected_tone' => 'Casual',
        ]);
    }
}
Don't forget to register the controller to the web route.
Route::get('/', [HomeController::class, 'index'])->name('home');Since we are using server sent event to streaming the text from ollama we can not send to many data to the url, so for that we need controller to handle the ourline data submitted by the user. So for that let's create OutlineController.
php artisan make:controller OutlineControllerAnd here's the content for the controller.
<?php

namespace App\Http\Controllers;

use Illuminate\Http\Request;
use App\Models\Outline;
use App\Services\OllamaService;

class OutlineController extends Controller
{
    protected OllamaService $service;

    public function __construct(OllamaService $service)
    {
        $this->service = $service;
    }

    public function store(Request $request)
    {
        $request->validate([
            'title' => 'required',
            'topic' => 'required',
            'tone' => 'required',
        ]);

        $outline = new Outline();
        $outline->title = $request->title;
        $outline->topic = $request->topic;
        $outline->tone = $request->tone;
        $outline->save();

        return redirect('/')->with('outline', $outline);
    }
}
Then we need to perform the text generation after we save the user input to database. Let's add new endpoint to stream the text generation.
private function send($event, $data)
{
    echo "event: {$event}\n";
    echo 'data: ' . $data;
    echo "\n\n";
    ob_flush();
    flush();
}

public function generate(Request $request, $id)
{
    $outline = Outline::findOrFail($id);
    return response()->stream(
        function () use (
            $outline
        ) {
            $result_text = "";
            $messages = $outline->getPromptMessages();
            $stream = $this->service->ask($messages);

            foreach ($stream as $response) {
                if ($response->done) {
                    break;
                }

                $text = $response->message->content;
                if (connection_aborted()) {
                    break;
                }
                $data = [
                    'text' => $text,
                ];
                $this->send("update", json_encode($data));
                $result_text .= $text;
            }

            $this->send("update", "<END_STREAMING_SSE>");
            $outline->content = $result_text;;
            $outline->save();
        },
        200,
        [
            'Cache-Control' => 'no-cache',
            'Connection' => 'keep-alive',
            'X-Accel-Buffering' => 'no',
            'Content-Type' => 'text/event-stream',
        ]
    );
}
And lastly don't forget to register the route.
Route::resource('outlines', OutlineController::class);
Route::get('outlines/generate/{id}', [OutlineController::class, 'generate'])->name('outlines.generate');
What's left is trigger the text generation from client. Now let's go back to our view welcome.blade.php and add this javascript code.
@push('scripts')
<link rel="stylesheet" href="https://cdn.jsdelivr.net/npm/easymde/dist/easymde.min.css">
<script src="https://cdn.jsdelivr.net/npm/easymde/dist/easymde.min.js"></script>
<script>
    const easyMDE = new EasyMDE({
        element: document.getElementById('editor'),
        spellChecker: false,
        hideIcons: ["fullscreen", "undo", "redo", "side-by-side", ],
    });

    const btnSend = document.getElementById("btn-send");
    const inputMesage = document.getElementById("input-mesage");
    let stillWriting = false;

    const btnLoadingEl = `<div class="spinner-border spinner-border-sm text-white" role="status"></div><span class="ms-2">Generating</span>`;
    const btnEl = `<span>Submit</span>`;

    const triggerStreaming = (outlineId) => {
        stillWriting = true;
        btnSend.classList.add("disabled")
        btnSend.innerHTML = btnLoadingEl;
        const source = new EventSource(
            `/outlines/generate/${outlineId}`,
        );
        let sseText = "";

        source.addEventListener("update", (event) => {
            if (event.data === "<END_STREAMING_SSE>") {
                source.close();
                stillWriting = false;
                btnSend.innerHTML = btnEl;
                btnSend.classList.remove("disabled")
                return;
            }
            const data = JSON.parse(event.data);
            if (data.text) {
                sseText += data.text;
                easyMDE.value(sseText);
            }
        });
    };

    btnSend.addEventListener("click", () => {
        submitSendMessage()
    })

    const outlineId = @json($outline_id);
    if (outlineId) {
        console.log(outlineId)

        setTimeout(() => {
            triggerStreaming(outlineId);
        }, 300);
    }
</script>
@endpush
Conclusion
In this post, we explored how to integrate the powerful Ollama framework with Laravel projects, enabling us to leverage local large language models (LLMs) like Llama 2 and Mistral.
One of the coolest things about using local LLMs is that you get to keep your data nice and cozy, away from prying eyes. Plus, you won't have to worry about racking up a massive bill from cloud providers when you want to experiment and play around with different ideas.
Overall, Ollama provides a lightweight and extensible solution for running large language models locally, offering greater control and flexibility in our AI projects. I encourage you to explore Ollama further and consider integrating it into your Laravel projects to unlock the power of local LLMs.
If you've got any questions, feedback, or cool ideas to share, don't hesitate to drop me an email or hit me up on social media. Let's keep pushing the boundaries and see what else we can achieve with Laravel and AI!