File management is a crucial aspect of modern web applications, and Laravel developers often need to handle file uploads and storage efficiently. There are many cloud providers that offer services to upload your files to a content delivery network (CDN).
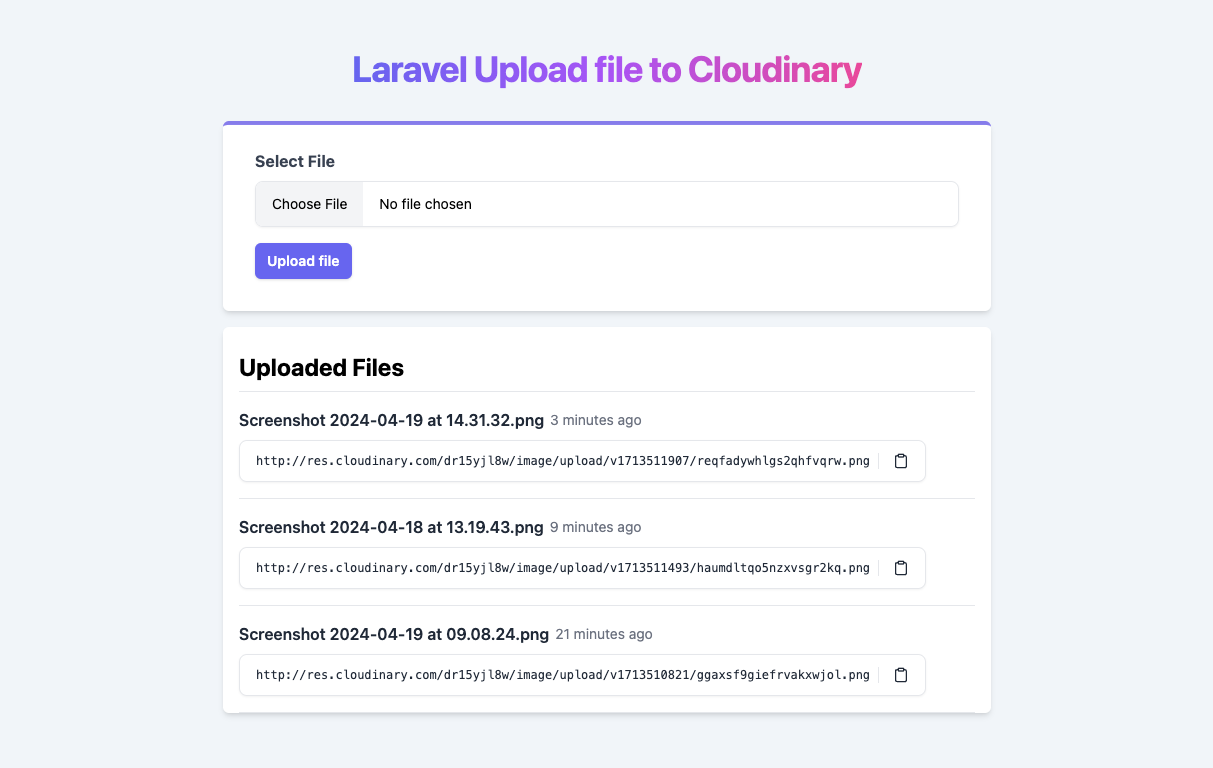
Today, we will learn how to use the Cloudinary provider because it's easy to use and has a PHP Composer package, allowing us to seamlessly integrate it with our Laravel code. By the end of this tutorial, you will be able to build a simple Laravel app that looks like this.
Prerequisites
Before we dive into integrating Cloudinary with Laravel, ensure that you have the following prerequisites in place:
-
Laravel Version: This tutorial is compatible with Laravel 10 or higher.
-
Cloudinary Account: You'll need to create a Cloudinary account if you haven't already. Visit the Cloudinary website and sign up for a free account. Cloudinary offers a generous free tier that should suffice for testing and development purposes.
-
Cloudinary Credentials: After creating your Cloudinary account, you'll need to obtain your Cloudinary credentials.
Go to console to get the secret key: https://console.cloudinary.com/console
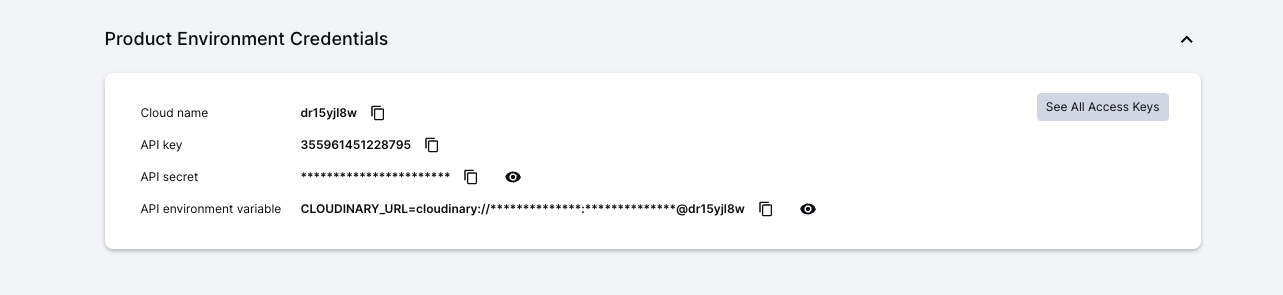
Add the CLOUDINARY_URL to your .env file:
CLOUDINARY_URL=cloudinary://xxx:xxx@xxxOnce you have a compatible Laravel version and a Cloudinary account with the necessary credentials, you're ready to proceed with the integration process. In the next section, we'll cover installing and configuring the Cloudinary PHP library in your Laravel project.
Installing the Cloudinary PHP Library
To integrate Cloudinary with your Laravel application, you'll need to install the official Cloudinary PHP library. This library provides a convenient way to interact with the Cloudinary API and simplifies the process of uploading and managing files.
Open your terminal, navigate to your Laravel project's root directory, and run the following command to install the Cloudinary PHP library via Composer:
composer require cloudinary/cloudinary_php
This command will add the Cloudinary PHP library as a dependency to your project's composer.json file and install the necessary files.
In your Laravel application's .env file:
CLOUDINARY_URL=cloudinary://xxx:xxx@xxxAfter completing these steps, the Cloudinary PHP library is installed and configured in your Laravel application. You can now utilize the library's functionality to upload and manage files with Cloudinary seamlessly.
Set up some boilerplate code for the frontend
In the frontend, we will use Tailwind CSS and preline Tailwind CSS components for styling our user interface.
In welcome.blade.php add this code:
<!DOCTYPE html>
<html lang="{{ str_replace('_', '-', app()->getLocale()) }}">

<head>
    <meta charset="utf-8">
    <meta name="viewport" content="width=device-width, initial-scale=1">

    <title>Laravel Cloudinary Example</title>
    <script src="https://cdn.tailwindcss.com"></script>
    <script src="https://unpkg.com/clipboard@2.0.11/dist/clipboard.min.js"></script>
    <script src="https://unpkg.com/preline@2.1.0/index.js"></script>
</head>

<body class="bg-slate-100 h-screen flex items-center justify-center">


    <script>
        // INITIALIZATION OF CLIPBOARD
        // =======================================================
        (function() {
            window.addEventListener('load', () => {
                const $clipboards = document.querySelectorAll('.js-clipboard-example');
                $clipboards.forEach((el) => {
                    const isToggleTooltip = HSStaticMethods.getClassProperty(el, '--is-toggle-tooltip') === 'false' ? false : true;
                    const clipboard = new ClipboardJS(el, {
                        text: (trigger) => {
                            const clipboardText = trigger.dataset.clipboardText;

                            if (clipboardText) return clipboardText;

                            const clipboardTarget = trigger.dataset.clipboardTarget;
                            const $element = document.querySelector(clipboardTarget);

                            if (
                                $element.tagName === 'SELECT' ||
                                $element.tagName === 'INPUT' ||
                                $element.tagName === 'TEXTAREA'
                            ) return $element.value
                            else return $element.textContent;
                        }
                    });
                    clipboard.on('success', () => {
                        const $default = el.querySelector('.js-clipboard-default');
                        const $success = el.querySelector('.js-clipboard-success');
                        const $successText = el.querySelector('.js-clipboard-success-text');
                        const successText = el.dataset.clipboardSuccessText || '';
                        const tooltip = el.closest('.hs-tooltip');
                        const $tooltip = HSTooltip.getInstance(tooltip, true);
                        let oldSuccessText;

                        if ($successText) {
                            oldSuccessText = $successText.textContent
                            $successText.textContent = successText
                        }
                        if ($default && $success) {
                            $default.style.display = 'none'
                            $success.style.display = 'block'
                        }
                        if (tooltip && isToggleTooltip) HSTooltip.show(tooltip);
                        if (tooltip && !isToggleTooltip) $tooltip.element.popperInstance.update();

                        setTimeout(function() {
                            if ($successText && oldSuccessText) $successText.textContent = oldSuccessText;
                            if (tooltip && isToggleTooltip) HSTooltip.hide(tooltip);
                            if (tooltip && !isToggleTooltip) $tooltip.element.popperInstance.update();
                            if ($default && $success) {
                                $success.style.display = '';
                                $default.style.display = '';
                            }
                        }, 800);
                    });
                });
            })
        })()
    </script>

</body>

</html>
Creating the File Upload Form
Before we can upload files to Cloudinary, we need to create a form in our Laravel application that allows users to select and submit files for upload. In this section, we'll create a Blade component with Tailwind CSS styling to build a simple yet visually appealing file upload form.
<form action="{{ route('upload') }}" method="POST" enctype="multipart/form-data" class="bg-white shadow-md rounded-md px-8 pt-6 pb-8 mb-4 border-t-4 border-indigo-600/70">
    @csrf
    <div class="mb-4">
        <label class="block text-gray-700 font-bold mb-2" for="file-input">
            Select File
        </label>
        <input type="file" name="file" id="file-input" class="block w-full border border-gray-200 shadow-sm rounded-lg text-sm focus:z-10 focus:border-blue-500 focus:ring-blue-500 disabled:opacity-50 disabled:pointer-events-none
        file:bg-gray-100 file:border-0
        file:me-4
        file:py-3 file:px-4
        file:cursor-pointer">
    </div>
    <div class="flex items-center justify-between">
        <button type="submit" class="py-2 px-3 bg-indigo-500 text-white text-sm font-semibold rounded-md shadow focus:outline-none" tabindex="-1">
            Upload file
        </button>
    </div>
</form>
With this setup, you now have a visually appealing file upload form in your Laravel application. When a user selects a file and submits the form, the file data will be sent to the server for processing.
Uploading Files to Cloudinary
Let's create a controller to render the upload file form and handle the uploading to Cloudinary. We'll name the controller FileUploadController. Use this command to create the controller:
php artisan make:controller FileUploadControllerIn the FileUploadController class, let's add a new method that will accept the POST request to upload the file to Cloudinary.
public function upload(Request $request)
{
    $request->validate([
        'file' => 'required|file|max:10240',
    ]);

    $cloudinary = new Cloudinary();
    $uploadApi = $cloudinary->uploadApi();
    $result = $uploadApi->upload($request->file('file')->getRealPath());

    return redirect()->back()->with('success', 'File uploaded successfully!');
}
Storing File Details in the Database
Create table to store the file we upload to cloudinary, we will save the file name and url.
php artisan make:model UploadedFile -mThen update the schema to be like this:
Schema::create('uploaded_files', function (Blueprint $table) {
    $table->id();
    $table->string('file_name');
    $table->string('public_id');
    $table->string('url');
    $table->timestamps();
});
Run the migration:
php artisan migrateUpdate the UploadedFile model to be like this.
class UploadedFile extends Model
{
    use HasFactory;

    protected $fillable = [
        'file_name',
        'public_id',
        'url',
    ];
}
Now let's update the FileUploadController:
public function upload(Request $request)
{
    $request->validate([
        'file' => 'required|file|max:10240',
    ]);

    $cloudinary = new Cloudinary();
    $uploadApi = $cloudinary->uploadApi();
    $result = $uploadApi->upload($request->file('file')->getRealPath());

+    $publicId = $result['public_id'];
+    $url = $result['url'];

+    $fileName = $request->file('file')->getClientOriginalName();
+    UploadedFile::create([
+        'file_name' => $fileName,
+        'public_id' => $publicId,
+        'url' => $url,
+    ]);

    return redirect()->back()->with('success', 'File uploaded successfully!');
}
Displaying Uploaded Files
After successfully uploading files to Cloudinary and storing the file details in the database, you'll likely want to display these uploaded files in your Laravel views. Let's do just that.
In your FileUploadConrtoller add this method to pull the files from our database:
public function index()
{
    $uploadedFiles = UploadedFile::latest()->get();
    return view('welcome', compact('uploadedFiles'));
}
This code retrieves all the uploaded file records from the uploaded_files table, ordered by the latest upload first.
Render Uploaded Files in the View: In your Blade view file, you can loop through the $uploadedFiles collection and render the file details, such as the file name and the Cloudinary URL:
@foreach ($uploadedFiles as $uploadedFile)
    <div class="flex gap-x-3 py-4 border-b">
        <div class="grow">
            <h3 class="flex gap-x-1.5 font-semibold text-gray-800 pb-2 items-center">
                <a href="{{ $uploadedFile->url }}" class="hover:underline" target="_blank">{{ $uploadedFile->file_name }}</a> <span class="text-sm text-gray-500 font-normal">{{ $uploadedFile->created_at->diffForHumans() }}</span>
            </h3>
            <input type="hidden" id="hs-clipboard-tooltip" value="{{ $uploadedFile->url }}">
            <button type="button" class="js-clipboard-example [--trigger:focus] hs-tooltip relative py-3 px-4 inline-flex justify-center items-center gap-x-2 text-sm font-mono rounded-lg border border-gray-200 bg-white text-gray-800 shadow-sm hover:bg-gray-50 disabled:opacity-50 disabled:pointer-events-none" data-clipboard-target="#hs-clipboard-tooltip" data-clipboard-action="copy" data-clipboard-success-text="Copied">
                <span class="text-xs">{{ $uploadedFile->url }}</span>
                <span class="border-s ps-3.5">
                    <svg class="js-clipboard-default size-4 group-hover:rotate-6 transition" xmlns="http://www.w3.org/2000/svg" width="24" height="24" viewBox="0 0 24 24" fill="none" stroke="currentColor" stroke-width="2" stroke-linecap="round" stroke-linejoin="round">
                        <rect width="8" height="4" x="8" y="2" rx="1" ry="1"></rect>
                        <path d="M16 4h2a2 2 0 0 1 2 2v14a2 2 0 0 1-2 2H6a2 2 0 0 1-2-2V6a2 2 0 0 1 2-2h2"></path>
                    </svg>

                    <svg class="js-clipboard-success hidden size-4 text-blue-600 rotate-6" xmlns="http://www.w3.org/2000/svg" width="24" height="24" viewBox="0 0 24 24" fill="none" stroke="currentColor" stroke-width="2" stroke-linecap="round" stroke-linejoin="round">
                        <polyline points="20 6 9 17 4 12"></polyline>
                    </svg>
                </span>
                <span class="hs-tooltip-content hs-tooltip-shown:opacity-100 hs-tooltip-shown:visible opacity-0 transition-opacity hidden invisible z-10 py-1 px-2 bg-gray-900 text-xs font-medium text-white rounded-lg shadow-sm" role="tooltip">
                    Copied
                </span>
            </button>
        </div>
    </div>
@endforeach
Conclusion
In this blog post, we explored how to seamlessly integrate Cloudinary, a powerful cloud-based file management service, with Laravel applications. By leveraging the Cloudinary PHP library, we were able to streamline the process of uploading files to Cloudinary and storing file metadata in our Laravel application's database. We covered everything from installing and configuring the library to creating a visually appealing file upload form, handling the file upload process, storing file details in the database, and displaying uploaded files in Laravel views.
Additional Resources
- Official Cloudinary documentation : https://cloudinary.com/documentation/php_quickstart
- Laravel documentation: https://laravel.com/docs/11.x/filesystem
- Source code for this example project https://github.com/ahmadrosid/laravel-cloudinary-example